Well the title says it all really! I had to check wether or not I had actually posted this card! How bad is that? In fairness I made it 2 days ago, the night before my mate turned up to play, and it was put to one side for later, lol, so I am only a day behind!
This is quite a delicate card for me, so much so that I wonder wether it is too delicately coloured, wether I should have gone for darker inks or not?
But it's made, and you should all know by now, that I am an honest blogger, and boy have I posted some humdingers in the past!
So what have we got here? An amalgamation of electronic die cutting, manual embossing, stamping using inks, and using pens.
First to be produced was the bird with the flourish tail. Its actually a design I bought from the Silhouette store, and have converted it to be cut with the e-craft, on smooth white 250 gsm card stock. Beak to tail tip it measures 5 1/2", quite sizeable really. So fine I had this lovely bird.....what to do now?
So out came Mr Happy and a Sizzix embossing folder I received in my Goody bag from the My Craft Studio workshop in Doncaster. Okay, so now it is beautifully embossed, but it needs something to make it pop!
Milled Lavender Distress ink, and a large head blusher brush, as Doncaster had completely sold out of large Brushes for ink dusting with (boy was I not pleased about that), to add definition to the embossing.
Okay so now I am working in the lilac/purple range, which decided the base card colour, and the Matt cut from a sheet of 12 x 12" Docrafts Capsule collection paper.
A lilac ribbon, and it really needed something else.....hmmn! Okay, so out came some cute little stamps I got as a freebie with Nicky Hall's Creative Chronicles magazine, again from Doncaster. Some tiny little Lavender bunches! Perfect, but they are small, and I wanted to use 2 colours on the stamps........Whispers pens to the rescue! So a purple and a green pen at the ready I proceeded to stamp a little line of Lavender bunches above where I would place the ribbon. Huffing periodically to re-awaken the ink, yes those huff pens, they're the ones!
So ribbon attached, birdie attached, gems sorted just needed a sentiment, so Heartfelt wishes from the same stamp set, and what did I do? Picked up the WRONG INK PAD!!!! AAAAARRRGHHHH!!!!
Bit late now though! I picked up the Tattered Rose instead of the Milled Lavender! Now sorry I'm no Barbara Grey, even though the stamps are clear, as my hands dont hold steady enough, so it has to stay this way, until I root out everything again, and die cut a piece to stamp on, then I can cover it up, and hopefully hide the miss match in colours!
Told you I'm honest lol
hugs to all who make mistakes, Boy do I know how you feel!
So lets see if the various members of challenge groups have a good old giggle at my mistake!
The Pink Elephant:: TPE 160, use ribbon
Papertake Weekly Challenge: Anything goes
lou xxx
Card and paper crafting keeps me sane! But this is now mainly a Vlog, due to Eyesight issues. Please feel free to use my designs for inspiration Purposes, but do not Directly copy, or pass my work off as your own. I would rather inspire, than be "flattered" by copying, xx
Pages
If you like my blog please Follow, and I'll hop along and return the favour
Showing posts with label Sizzix. Show all posts
Wednesday, August 08, 2012
Tuesday, January 10, 2012
L8 card
Well I was posed a right doozey today.............make a number, a large one in height and decorate it. HUH?
What on earth am I going to do with that I thought!!
It had to be over 3" in height, and decorated!!!! You have to be kidding!!!
So, thinking cap on, not easy when you are doped to the max with painkillers, as Mr Bursitis has decided to pay a visit, so even moving the little finger is painful, but...............thought I did, long and hard, and eventually came up with text speak, you know when kids substitute letters in a text or email, as they are too lazy to write the words properly, L8 was conceived!!
and its all for Ditzy-Craftymess, ta guys!!
so here's my paltry offering...........
a 5 3/4 inch card base, 350 gsm,
Backing paper from an A5 sheet, The Finishing touch by My Craft Studio,
Purple Whisper Pen ink,
A Happy Birthday stamp,
Some flower stamps from I have no idea where
Some flowers made with tonic punches,
A few flowers from my stash,
Some mirri board, and a piece of ribbon
So first cover the card base with the backing paper, making sure that the notice board is central, and trim. As I dont have exactly the right shade of lilac/purple, I had to improvise, luckily I invested in some of the Whispers pens, just after the NEC show, and I had the right shade! Lots of colouring and huffing L8r I had the background stamped with Happy Birthday! , then onto creating the number 8.......Out came Mr Happy, and the Sizzix circle dies, as I am totally Pants at cutting circles! So hang the piece of card over the edge of the cutting plate, tape into position, and the do it again using a smaller circle to overlap, and create the figure 8, Then the smallest circle die, (artistically placed please note) and cut the holes in the figure 8. Ok now to cover it in flower stamps. These came from my huge wooden box of 50 stamp's I got from Amazon last year, but I have no idea whos stamps they are as it doesnt say!! So huff and puff and colour, and huff, and colur, oh and some puffing, as I was trying to catch my breath, more huffing and colouring, and more puffing, and finally it was covered with the Flowers design, phew!!
Ok but I needed more, so cut the L out of some holographic Mirri Board, to the same height as the 8, and sit and catch my breath and do some more thinking!! So Flowers was the predominating theme, ok so root out some of my graduated card stock, and start punching, now dont ask me which Tonic punches they are as I get very confused with them!! Janelle, and something I think, but I could be wrong! and start rolling and gluing the flowers together, then raid the stash for some professionally made flowers, to intersperse with my home made ones as I could be there all night, a bit of bling in the form of some "pearl" beads, stick it all down, add a bit of white holographic ribbon, to tie it all together and I am done, phew!!
What on earth am I going to do with that I thought!!
It had to be over 3" in height, and decorated!!!! You have to be kidding!!!
So, thinking cap on, not easy when you are doped to the max with painkillers, as Mr Bursitis has decided to pay a visit, so even moving the little finger is painful, but...............thought I did, long and hard, and eventually came up with text speak, you know when kids substitute letters in a text or email, as they are too lazy to write the words properly, L8 was conceived!!
and its all for Ditzy-Craftymess, ta guys!!
so here's my paltry offering...........
a 5 3/4 inch card base, 350 gsm,
Backing paper from an A5 sheet, The Finishing touch by My Craft Studio,
Purple Whisper Pen ink,
A Happy Birthday stamp,
Some flower stamps from I have no idea where
Some flowers made with tonic punches,
A few flowers from my stash,
Some mirri board, and a piece of ribbon
So first cover the card base with the backing paper, making sure that the notice board is central, and trim. As I dont have exactly the right shade of lilac/purple, I had to improvise, luckily I invested in some of the Whispers pens, just after the NEC show, and I had the right shade! Lots of colouring and huffing L8r I had the background stamped with Happy Birthday! , then onto creating the number 8.......Out came Mr Happy, and the Sizzix circle dies, as I am totally Pants at cutting circles! So hang the piece of card over the edge of the cutting plate, tape into position, and the do it again using a smaller circle to overlap, and create the figure 8, Then the smallest circle die, (artistically placed please note) and cut the holes in the figure 8. Ok now to cover it in flower stamps. These came from my huge wooden box of 50 stamp's I got from Amazon last year, but I have no idea whos stamps they are as it doesnt say!! So huff and puff and colour, and huff, and colur, oh and some puffing, as I was trying to catch my breath, more huffing and colouring, and more puffing, and finally it was covered with the Flowers design, phew!!
Ok but I needed more, so cut the L out of some holographic Mirri Board, to the same height as the 8, and sit and catch my breath and do some more thinking!! So Flowers was the predominating theme, ok so root out some of my graduated card stock, and start punching, now dont ask me which Tonic punches they are as I get very confused with them!! Janelle, and something I think, but I could be wrong! and start rolling and gluing the flowers together, then raid the stash for some professionally made flowers, to intersperse with my home made ones as I could be there all night, a bit of bling in the form of some "pearl" beads, stick it all down, add a bit of white holographic ribbon, to tie it all together and I am done, phew!!
Friday, December 09, 2011
Cards for my crafty friends.
Well another post, these are all the same design, as I do believe that this is unique to me........
Paying attention? Then I'll begin.........
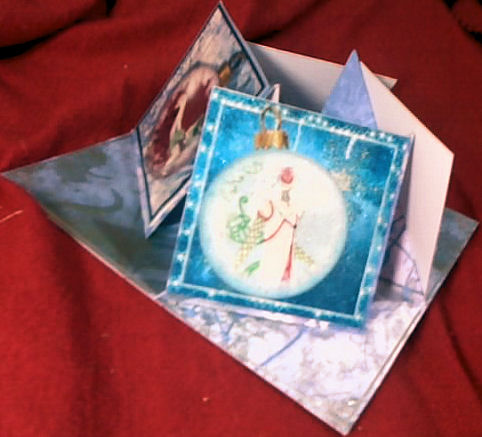
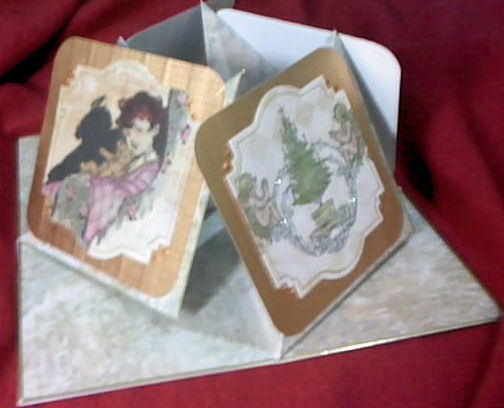
its a quadruple twisted easel card, measuring 8x8 inches. And I do believe no one else has come up with this, but its really easy to do, and I'll soon set up a new page for my own design creations on this blog, so keep your eyes open.........
This one was done using K&Co Glittered letters, Some Papermania Christmas Henbury Lane papers, Berry Merry Christmas 6x6 papers by Jennifer Ellory, and some paper from my stash, which is years old, but I think its again a papermania one.
I folded the Berry Merry papers using Mel Heatons paper Fold technique, inserted and glued the Papermania Henbury lane inside, and matted it onto some red textured card, followed by some holographic Mirri card which I bought quite a while ago at one of the Manchester Craft shows, this was way before it became popular and I got loads of packs of it for a pound.
The base was prepared using the old Papermania 12x12, and then scored at 4 inches, and again diagonally, to create the twisted easel. The bases were then stuck on with DST, and the glittered letters glued on and some peel offs added to edge the base. There are NO stoppers on this card at all. Its all to do with the way its assembled, so it then lies flat and slips into an ordinary 8x8 envelope for posting, with no extra charge for bulky letters!! Yet it is a dimensional card which displays pictures all the way around.
All these images and papers came from the My Craft Studio Christmas Classics Looking Out cd, I just used a bit of gold Holographic card to mount the images on. The images for the Toppers are printed on Pearlescent paper, and then Ultra fine Crystal Glitter was liberally applied.
This one is again all My Craft Studio, but this time the Walk in Winter Wonderland Cd. I printed the Fairy Baubles onto Acetate, and liberally coated the inky side with Crafters Companion Gold Spray and Sparkle to seal it, mounted the images to some white cardstock. Then on the outside of the acetate image I used a versa mark pen, and some gold Pearlescent embossing powder to edge the baubles, and some glittered Gold embossing Powder for the bauble tops.
Again MCS Winter Wishes Cd this time, printed on supersmooth Xerox 250gsm card, I got a full ream of this wonderful card for £7.99 from everycraftsapound.co.uk, a few weeks ago, and it is superb in both my inkjet and my laser printer. I actually printed the images twice, one slightly larger than the other, and then layered the smaller image on top of the larger one using DST . I also ran round the edge of each topper with a silver paint pen, to finish the edges off nicely. Then I used glitter, Crystal Accents, Fluffy Stuff, and also some mica powder in paint form to highlight various snowflakes throughout the images.
These images and paper were taken from makinghandmadecards.com, where I am a member, and this is from the Vintage Quick Christmas Cards download. I used Whispers Dual tip Markers and a water brush to colour the images, Highlighted small areas with Cosmic Shimmer Mica inks, and then used the Spellbinders Labels 22 with the Happy Cut to cut them out.
I then mounted them onto some C&C textured Gold Cardstock, and used Cosmic Shimmer, Olympic Gold Pearlescent Glue which dies dimensional, to create pearls of gold, and used Crystal Glitter to highlight areas. The the old corner chomper by We R Memory Keepers came out to play, and I used the 1/2 inch end.
This one used Crafters Companion Christmas Humphrey's Corner images and backing papers. I cut each image out using the lattice rectangles by Spellbinders, and matted them onto some Green patterned Mirri. each image has at least one area which was brightened with Cosmic Shimmer Mica inks, then Crystal Glitter, and MCS Snow was applied. The base was brightened up using the edges of some Holographic Peel offs, you know the straight bits down the sides, well "waste not, want not" as the old saying goes.
And last but not least..
Again Humphrey's Corner Christmas CD by Crafters Companion, some red printed cardstock, some holographic silver mirri card, and Cosmic Shimmer inks, and Crystal Glitter. These were cut using Sizzix circle dies, and the base was trimmed with some silver holographic peel offs and corners for interest.
Phew that took some time to write, as unbeknownst to you lot reading this, youngest had inserted himself into my crafting chair, and was making some Christmas cards..........." Mum....how do I ? Can you help.......Can you do this bit..........can you heat this? Can I borrow your mouse mat?
yep think you get the idea now lol. But here's one of his cards that he has just made..........
Not too bad for a nine year old, but I need to work on his stamping a bit I think!
Paying attention? Then I'll begin.........
its a quadruple twisted easel card, measuring 8x8 inches. And I do believe no one else has come up with this, but its really easy to do, and I'll soon set up a new page for my own design creations on this blog, so keep your eyes open.........
This one was done using K&Co Glittered letters, Some Papermania Christmas Henbury Lane papers, Berry Merry Christmas 6x6 papers by Jennifer Ellory, and some paper from my stash, which is years old, but I think its again a papermania one.
I folded the Berry Merry papers using Mel Heatons paper Fold technique, inserted and glued the Papermania Henbury lane inside, and matted it onto some red textured card, followed by some holographic Mirri card which I bought quite a while ago at one of the Manchester Craft shows, this was way before it became popular and I got loads of packs of it for a pound.
The base was prepared using the old Papermania 12x12, and then scored at 4 inches, and again diagonally, to create the twisted easel. The bases were then stuck on with DST, and the glittered letters glued on and some peel offs added to edge the base. There are NO stoppers on this card at all. Its all to do with the way its assembled, so it then lies flat and slips into an ordinary 8x8 envelope for posting, with no extra charge for bulky letters!! Yet it is a dimensional card which displays pictures all the way around.
All these images and papers came from the My Craft Studio Christmas Classics Looking Out cd, I just used a bit of gold Holographic card to mount the images on. The images for the Toppers are printed on Pearlescent paper, and then Ultra fine Crystal Glitter was liberally applied.
This one is again all My Craft Studio, but this time the Walk in Winter Wonderland Cd. I printed the Fairy Baubles onto Acetate, and liberally coated the inky side with Crafters Companion Gold Spray and Sparkle to seal it, mounted the images to some white cardstock. Then on the outside of the acetate image I used a versa mark pen, and some gold Pearlescent embossing powder to edge the baubles, and some glittered Gold embossing Powder for the bauble tops.
Again MCS Winter Wishes Cd this time, printed on supersmooth Xerox 250gsm card, I got a full ream of this wonderful card for £7.99 from everycraftsapound.co.uk, a few weeks ago, and it is superb in both my inkjet and my laser printer. I actually printed the images twice, one slightly larger than the other, and then layered the smaller image on top of the larger one using DST . I also ran round the edge of each topper with a silver paint pen, to finish the edges off nicely. Then I used glitter, Crystal Accents, Fluffy Stuff, and also some mica powder in paint form to highlight various snowflakes throughout the images.
These images and paper were taken from makinghandmadecards.com, where I am a member, and this is from the Vintage Quick Christmas Cards download. I used Whispers Dual tip Markers and a water brush to colour the images, Highlighted small areas with Cosmic Shimmer Mica inks, and then used the Spellbinders Labels 22 with the Happy Cut to cut them out.
I then mounted them onto some C&C textured Gold Cardstock, and used Cosmic Shimmer, Olympic Gold Pearlescent Glue which dies dimensional, to create pearls of gold, and used Crystal Glitter to highlight areas. The the old corner chomper by We R Memory Keepers came out to play, and I used the 1/2 inch end.
This one used Crafters Companion Christmas Humphrey's Corner images and backing papers. I cut each image out using the lattice rectangles by Spellbinders, and matted them onto some Green patterned Mirri. each image has at least one area which was brightened with Cosmic Shimmer Mica inks, then Crystal Glitter, and MCS Snow was applied. The base was brightened up using the edges of some Holographic Peel offs, you know the straight bits down the sides, well "waste not, want not" as the old saying goes.
And last but not least..
Phew that took some time to write, as unbeknownst to you lot reading this, youngest had inserted himself into my crafting chair, and was making some Christmas cards..........." Mum....how do I ? Can you help.......Can you do this bit..........can you heat this? Can I borrow your mouse mat?
yep think you get the idea now lol. But here's one of his cards that he has just made..........
Not too bad for a nine year old, but I need to work on his stamping a bit I think!
Thursday, December 08, 2011
So what have I been up to?
Hmmn, now lets see what I can actually post!
okay...some are still waiting to go to various people who might check my blog, but I think I should be ok posting these cards, as the recipients wont know to look here, so if you're peeking Linda, neither of these are destined for you!!!
Hmmn so what did I use? Oh yes! White silk art A3 card, 300gsm, Cream pearlised cardstock, 300gsm, green card stock 350gsm, white pearlised paper 120gsm, green Mirri card, Ribbon, pearlised shell button, die cut flowers, mouldable plastic leaves, gold embossing powder, green detail embossing powder, Versamark ink pad, Cosmic shimmer, Stamps away Mica mist, A4 Stamps Away leaf mask, Hunkydory Cream Holly Flourish cardstock 300gsm, bits from stash, Happy Cut, Spellbinders dies and embossibilities.
so....A3 folded in half, for card base. Green cardstock covered with diagonal strips of DST, and then alternately glittered with Gold and light green glitter. This re-inforced the base, and provided a tie in with the darker Holly Leaves on the main card.
Next I used the Spellbinders Fancy Flourish Embossabilities on one sheet of the cream pearlised cardstock, and cut it using the Grand Fancy Frames by Go Kreate. Then I used the A4 Leaf mask from Stamps Away, and embossed it, then sprayed with Stamps away Emerald Green Mica Mist, before removing the mask. Then I used the first sheet and some shaker Tape to create a shaker card topper, using Hunkydory Snowfall Acetate, and bits from the stash for the shaker elements. Cosmic Shimmer Olympic Gold PVA for the pearls round the edge of the shaker.
Cream Pearlised cardstock was then cut using the poor old Happy Cut (It really took a beating making this card!), using the Lattice Rectangles form Spellbinders, and embossed with the Fancy Flourish embossabilities die.then I carefully used the versamark inkpad through the die and then used the green detail powder over the top and embossed it . I then distressed it using the same embossibility die and versamark, but with Gold pearlescent embossing powder. I used the sizzix fancy frames to create 2 small toppers, one of green cardstock, which I then ran a gold paint pen round the side of, and some plain white cardstock, which I tripple embossed with some antique Gold embossing powder, into which I stamped Happy Christmas.
I used the spellbinders Poinsettia dies and some emerald green Mica Mist with some square headed brass brads from my stash, and a die cut paper Flower expert Rose (My Crfat Studio). Some die cut Ivy leaves, and some Mouldable Plastic Holly (MCS), with a die cut green mirri holly leaf, again a Spellbinders die.
Some cream/gold organza flowers from my stash, some trimming from the stash (coz I cant remember what the bead things on the clear plastic are called), and some ribbon threaded through a shell button to finish the Topper.
The Stopper on the base is made from the Grand Hexagonal Petal Envelope die, again by Spellbinders, it was again embossed with the Stamps Away Leaf Mask, and I distressed the inside of the envelope with Tim Holtz Antique Linen Distress ink before writing the greeting in the middle of the Envelope. I fixed that to the base of the card with Pinflair.
Basically, a LOT of work, lol, and its still not being sent to you Linda!! It was part of a Christmas card swap we arranged in the My Craft Studio Platinum Club, and Hubby wasn't overly impressed with what it cost to post either lol!
Next up is a commission for the Pet shop Owners Daughter.
This is a design By Debbie Moore, from the new Pick of the Week on Create and Craft, which arrived today!
I don't normally go for Debbie Moore, but this one was an interesting idea....Grotto Cards!
I wasnt happy with the colours on this, so I did import it into a pdf manipulation program, and then into My Craft Studio, who's software is so easy for me to use, I really cant get to grips with other graphics programs, too many buttons and switches for me!! So If I want to do something different I always use MCS, hence why it crops up so often in my posts.
So I wanted to do a card for a 17yr old girl for Christmas from her Father, all I have is her name and age........Ta Jimmy that helps alot!!
So this Debbie Moore CD seemed to offer possibilities. Firstly, I didn't like the original background, which was Mushrooms, and Snowdrops, so I imported an image into MCS from their Walk in Winter Wonderland CD, a snowy cottage, perfect, but it was blue. hmmn ok, then change the girls dress to blue then. I imported the template design from the DM cd into MCS, and cut out the middle so I could fit the image to the template. That done, it was a simple matter to then print and cut out the background image, which is marked with fold and score lines. I sprayed the whole creation with Crafters Companion Gold Spray and Sparkle, and cut out the decoupage. The Fairys wings, are highlighted with cosmic shimmer Midnight Blue Mica Ink, and the Blue Tit is highlighted with Denim and Sunrise Yellow Mica inks. The Snowdrops got a touch of Crystal Lacquer, and it folds VERY flat, and you can make the envelope boxes from the Debbie Moore Cd, although I do think it will be flat enough to go in a C5 envelope.
There is a box underneath to help support the whole structure, though it is very sturdy in itself, and that is where the sentiment is but you cant see it on the pictures unfortunately, and you can also make presentation boxes for the cards, which look fabulous I must admit,, but I havent done that with this one, as I'm not sure whether this will please the Pet Shop Owner , and he may want to post it, in which case, a display/presentation box will be too bulky.
Right one last thing for tonight.........a friend of mine, the infamous Linda, would love to reach 175 Followers, and is offering candy on her blog Here so please pop along and have a peek, she's doing really well, doing some DT work, and getting Blog awards.
I would really like to thank my handful of followers, you are great guys and girls, and I really appreciate your support and comments, thanks guys, mmwah!
okay...some are still waiting to go to various people who might check my blog, but I think I should be ok posting these cards, as the recipients wont know to look here, so if you're peeking Linda, neither of these are destined for you!!!
Hmmn so what did I use? Oh yes! White silk art A3 card, 300gsm, Cream pearlised cardstock, 300gsm, green card stock 350gsm, white pearlised paper 120gsm, green Mirri card, Ribbon, pearlised shell button, die cut flowers, mouldable plastic leaves, gold embossing powder, green detail embossing powder, Versamark ink pad, Cosmic shimmer, Stamps away Mica mist, A4 Stamps Away leaf mask, Hunkydory Cream Holly Flourish cardstock 300gsm, bits from stash, Happy Cut, Spellbinders dies and embossibilities.
so....A3 folded in half, for card base. Green cardstock covered with diagonal strips of DST, and then alternately glittered with Gold and light green glitter. This re-inforced the base, and provided a tie in with the darker Holly Leaves on the main card.
Next I used the Spellbinders Fancy Flourish Embossabilities on one sheet of the cream pearlised cardstock, and cut it using the Grand Fancy Frames by Go Kreate. Then I used the A4 Leaf mask from Stamps Away, and embossed it, then sprayed with Stamps away Emerald Green Mica Mist, before removing the mask. Then I used the first sheet and some shaker Tape to create a shaker card topper, using Hunkydory Snowfall Acetate, and bits from the stash for the shaker elements. Cosmic Shimmer Olympic Gold PVA for the pearls round the edge of the shaker.
Cream Pearlised cardstock was then cut using the poor old Happy Cut (It really took a beating making this card!), using the Lattice Rectangles form Spellbinders, and embossed with the Fancy Flourish embossabilities die.then I carefully used the versamark inkpad through the die and then used the green detail powder over the top and embossed it . I then distressed it using the same embossibility die and versamark, but with Gold pearlescent embossing powder. I used the sizzix fancy frames to create 2 small toppers, one of green cardstock, which I then ran a gold paint pen round the side of, and some plain white cardstock, which I tripple embossed with some antique Gold embossing powder, into which I stamped Happy Christmas.
I used the spellbinders Poinsettia dies and some emerald green Mica Mist with some square headed brass brads from my stash, and a die cut paper Flower expert Rose (My Crfat Studio). Some die cut Ivy leaves, and some Mouldable Plastic Holly (MCS), with a die cut green mirri holly leaf, again a Spellbinders die.
Some cream/gold organza flowers from my stash, some trimming from the stash (coz I cant remember what the bead things on the clear plastic are called), and some ribbon threaded through a shell button to finish the Topper.
The Stopper on the base is made from the Grand Hexagonal Petal Envelope die, again by Spellbinders, it was again embossed with the Stamps Away Leaf Mask, and I distressed the inside of the envelope with Tim Holtz Antique Linen Distress ink before writing the greeting in the middle of the Envelope. I fixed that to the base of the card with Pinflair.
Basically, a LOT of work, lol, and its still not being sent to you Linda!! It was part of a Christmas card swap we arranged in the My Craft Studio Platinum Club, and Hubby wasn't overly impressed with what it cost to post either lol!
Next up is a commission for the Pet shop Owners Daughter.
This is a design By Debbie Moore, from the new Pick of the Week on Create and Craft, which arrived today!
I don't normally go for Debbie Moore, but this one was an interesting idea....Grotto Cards!
I wasnt happy with the colours on this, so I did import it into a pdf manipulation program, and then into My Craft Studio, who's software is so easy for me to use, I really cant get to grips with other graphics programs, too many buttons and switches for me!! So If I want to do something different I always use MCS, hence why it crops up so often in my posts.
So I wanted to do a card for a 17yr old girl for Christmas from her Father, all I have is her name and age........Ta Jimmy that helps alot!!
So this Debbie Moore CD seemed to offer possibilities. Firstly, I didn't like the original background, which was Mushrooms, and Snowdrops, so I imported an image into MCS from their Walk in Winter Wonderland CD, a snowy cottage, perfect, but it was blue. hmmn ok, then change the girls dress to blue then. I imported the template design from the DM cd into MCS, and cut out the middle so I could fit the image to the template. That done, it was a simple matter to then print and cut out the background image, which is marked with fold and score lines. I sprayed the whole creation with Crafters Companion Gold Spray and Sparkle, and cut out the decoupage. The Fairys wings, are highlighted with cosmic shimmer Midnight Blue Mica Ink, and the Blue Tit is highlighted with Denim and Sunrise Yellow Mica inks. The Snowdrops got a touch of Crystal Lacquer, and it folds VERY flat, and you can make the envelope boxes from the Debbie Moore Cd, although I do think it will be flat enough to go in a C5 envelope.
There is a box underneath to help support the whole structure, though it is very sturdy in itself, and that is where the sentiment is but you cant see it on the pictures unfortunately, and you can also make presentation boxes for the cards, which look fabulous I must admit,, but I havent done that with this one, as I'm not sure whether this will please the Pet Shop Owner , and he may want to post it, in which case, a display/presentation box will be too bulky.
Right one last thing for tonight.........a friend of mine, the infamous Linda, would love to reach 175 Followers, and is offering candy on her blog Here so please pop along and have a peek, she's doing really well, doing some DT work, and getting Blog awards.
I would really like to thank my handful of followers, you are great guys and girls, and I really appreciate your support and comments, thanks guys, mmwah!
Tuesday, October 25, 2011
busy busy busy!!!
well thought I'd post the finished article for those following the Woww!
Clean, simple, and effective.
Black card, sprayed with silver Crafters Companion glitter spray, the Sizzix framelits dies ( for those struggling to find these I got mine from crafting.co.uk), Stamps away Pilkington Carol Singers, a papermania Noel greeting, with Adirondack Pitch Black and a black and white polka dot bow with 3 ball headed sewing pins. And of course the obligatory glitter, I have a huge "Glitter Station" of My Craft Studios, Crystal glitter, which I use all the time!!
In the meantime, I have been busy, the craft room is tidied, the card stock re-arranged, and the huge pile of scraps..........., well it doesn't even fill a small tray. Hows that!!
I must admit, I was quite hard with myself, and threw some of it away, but I did do as Sue H suggested, lol, and put most of it back where it came from so
Please note, this was actually taken with me lying back on my poor old Garden table, that is currently my work area, lol the edge of the grey baskets are right next to the edge of the table, I am really surprised I didnt break it, as its Glass!!!
On top are my coloured papers, my La Pashe collection, soon to be extinct as I have the New mega disk on order, my boxes of Barbara Grey Classroom stamps, a Giant Christmas Rossette, and my patterned card. Next shelf down are my Pearlescent card and paper, and my Mirri Board, my Design Runner, my large Hollands Pie dish, that holds my melted embossing powder for glazing, and my Big and Juicy pads.
Next shelf is the A4 and 12x12 card stock, with my Clarity card, and finally my A3 cardstock, some oversized paper for making bags with, and my patterned papers, 6x6, 8x8, and 12x12. On the bottom shelf is a couple of reams of insert paper, my light box, and my spare glues and sprays.
Hanging from the sides are the 2 loves of my life, my Tonic Guillotines. Oh and my Parchment grids. The butchers block I use for the glazing, embossing, anything to do with heat, and under it is my beloved Foil-it Machine, you can just see the back corner sticking out!
I love the foiling machine.....it is so easy to use and creates some outstanding effects which can be totally unique.
This one was created in Docrafts Digital designer. The trees and the deer/stag were silhouette images which I printed on my laser printer, then foiled in green and matt gold foil from Patsy-May. The tree shadows and hills (used with a Blitzer, a handheld air brush machine sort of thingy, but mine is a bulb that you squeeze and it propels small amounts of ink out of the pen to a masked area.) were using the Pastel Blue Promarker. The sun was the Lemon Promarker, again Blitzed.
The Flowers Holly leaves and pine cone are My Craft Studio Christmas Paper Flower Expert, with a bit of Glitter, all matted on to some Matt silver Mirri board.
Foiling is very cheap to do at home, once you have got past the initial expense of the Foil-it machine and foils. I use my inkjet printer to print the main background or picture first, then run it through my laser printer with a greeting or flourish (I have a new one, but you can pick up a cheap mono laser from ebay for silly money, a friend of mine got one for £4.99!!! And I thought I was cheap!!!). Any colour TONER from a laser printer will act as a glue when you heat it, not just black, so beware if you try to foil a lasered image! But the results and applications are amazing. I foil all my inserts, quite a few greetings, and it adds a really professional finish to the card.
Right I'm off up the M62 repeatedly for the next couple of days, so I shall probably miss the WOWW this week, but I'll try to visit everyone when I get back,
Have fun!!
xx
Clean, simple, and effective.
Black card, sprayed with silver Crafters Companion glitter spray, the Sizzix framelits dies ( for those struggling to find these I got mine from crafting.co.uk), Stamps away Pilkington Carol Singers, a papermania Noel greeting, with Adirondack Pitch Black and a black and white polka dot bow with 3 ball headed sewing pins. And of course the obligatory glitter, I have a huge "Glitter Station" of My Craft Studios, Crystal glitter, which I use all the time!!
In the meantime, I have been busy, the craft room is tidied, the card stock re-arranged, and the huge pile of scraps..........., well it doesn't even fill a small tray. Hows that!!
I must admit, I was quite hard with myself, and threw some of it away, but I did do as Sue H suggested, lol, and put most of it back where it came from so
Please note, this was actually taken with me lying back on my poor old Garden table, that is currently my work area, lol the edge of the grey baskets are right next to the edge of the table, I am really surprised I didnt break it, as its Glass!!!
On top are my coloured papers, my La Pashe collection, soon to be extinct as I have the New mega disk on order, my boxes of Barbara Grey Classroom stamps, a Giant Christmas Rossette, and my patterned card. Next shelf down are my Pearlescent card and paper, and my Mirri Board, my Design Runner, my large Hollands Pie dish, that holds my melted embossing powder for glazing, and my Big and Juicy pads.
Next shelf is the A4 and 12x12 card stock, with my Clarity card, and finally my A3 cardstock, some oversized paper for making bags with, and my patterned papers, 6x6, 8x8, and 12x12. On the bottom shelf is a couple of reams of insert paper, my light box, and my spare glues and sprays.
Hanging from the sides are the 2 loves of my life, my Tonic Guillotines. Oh and my Parchment grids. The butchers block I use for the glazing, embossing, anything to do with heat, and under it is my beloved Foil-it Machine, you can just see the back corner sticking out!
I love the foiling machine.....it is so easy to use and creates some outstanding effects which can be totally unique.
This one was created in Docrafts Digital designer. The trees and the deer/stag were silhouette images which I printed on my laser printer, then foiled in green and matt gold foil from Patsy-May. The tree shadows and hills (used with a Blitzer, a handheld air brush machine sort of thingy, but mine is a bulb that you squeeze and it propels small amounts of ink out of the pen to a masked area.) were using the Pastel Blue Promarker. The sun was the Lemon Promarker, again Blitzed.
The Flowers Holly leaves and pine cone are My Craft Studio Christmas Paper Flower Expert, with a bit of Glitter, all matted on to some Matt silver Mirri board.
Foiling is very cheap to do at home, once you have got past the initial expense of the Foil-it machine and foils. I use my inkjet printer to print the main background or picture first, then run it through my laser printer with a greeting or flourish (I have a new one, but you can pick up a cheap mono laser from ebay for silly money, a friend of mine got one for £4.99!!! And I thought I was cheap!!!). Any colour TONER from a laser printer will act as a glue when you heat it, not just black, so beware if you try to foil a lasered image! But the results and applications are amazing. I foil all my inserts, quite a few greetings, and it adds a really professional finish to the card.
Right I'm off up the M62 repeatedly for the next couple of days, so I shall probably miss the WOWW this week, but I'll try to visit everyone when I get back,
Have fun!!
xx
Subscribe to:
Posts (Atom)