If you like my blog please Follow, and I'll hop along and return the favour

Showing posts with label My Craft Studio. Show all posts

Wednesday, May 01, 2013

Ooh purdy!

Okay, well I seem to be coming to grips with it, just need to remember what to turn off and on all the time, as its so blooming quick!
I made this tonight, getting my settings right in my head, the hardest part. And Zingster didn't half zip through it!
So this is what I started with: A file from Amazingpopup.com, which I converted in MTC to a cut file. I aint doing it by hand!!!!!!!!!!!!!!!!!!!!

Minus the verse of course.
Next came the verse, from Verses 4 Cards, and draw on using one of my bronze Silhouette Pens.
Okay so now I had the Great Wall of China sitting in my hands.................

Now I needed a card.................. Well if my mate Lucy is reading this, now she will be killing herself laughing! I knew I had some oriental themed stuff from My Craft  Studio. Could I find it? Of course not, in desperation and only kidding I asked my mate, as we were chatting over FB, if she could tell me where it was.............okay she knows me too well!
So we found the box it was in, then as I was being a bit impatient with typing, when I wanted to be crafting, we Skyped, and she watched most of the process as I was making the card front.

Paper and topper from MCS, ribbon from my stash, Leanne Creatif die for the frame and leaves, and some embellies again from my stash, The stamp and die are from Whimsy Stamps in USA.

right, off to bed I go, think I'll have to give MTC a miss tonight, as too tired, and I have the school run in the morning, night all xxx

Tuesday, September 25, 2012

New Challenge running

Well Finally My Craft Studio have dipped a toe in the Waters of Blog challenges, about flipping time guys!!
My Mate Linda is running the first challenge, for a week, and I must admit, I have seen the effect from Midas Metallics, and it is AWESOME!!! So of course I just had to take part, to be in with the chance at some yummy Goodies!!

Here is my entry, the rules are really lax, but it wouldnt be fair not to use at least one MCS product in the challenge, so I did have something to hand....................


As anyone who knows me is probably aware, I am still using my e-craft to extremes, lol, and loving every minute of it, so I cut the Bauble and Mat on the ecraft, ran the Bauble through my Foiler, then gave it a good scrunch!
I needed a Background for it, so used some of the fabulous Tape that MCS produces for us crafters, this is from the Christmas set, and has Noel printed on it, to create the background, added more foil over the surface of the tape with some red tape, and then mounted it on to a matching green base card,

Hope you like it, xxx Now dont forget to pop over to Lindas blog and enter a Christmas card yourself! you never know...............

Thursday, August 16, 2012

Helping hand...........

Recently I popped over to Scrapbook Stamp Society, and treated myself to some new digi's , yum yum!
I bought a large Digi, called Fairy Dust collection by Morgan Fitz-simons, and used 1 part of the digi, to create this card for you to look at.


A5 piece of card, scored to form an A6 card base.
Mbossibilities folder by Spellbinders
3 Cool Grey promarkers. 2,3,4
Tonic Flower Punch.
Lace
Black gems
E-craft,
Digi image by Morgan Fitz-simons.

The E-craft doesnt come with an optical eye, but it is possible to get it to cut around a shape that you have printed out, I need to play a bit more before I do a video on it, lol.
But I got the e-craft to cut around the hand for me! Woo-hoo!!
Target for the day achieved, okay its not perfect, but trying to figure out the correlation between where my printer prints, and where the E-craft cuts is difficult! And then the brain got itself all confused, and I couldn't think any more!

I carefully trimmed around the hand I wanted to use in My Craft Studio Elite, (Keep an eye on the end of this post!) and printed it out from the Digi by Morgan Fitzsimons. Then cut it out with the E-craft.
Coloured it with the Promarkers, and added the black gems, Lace and Flower.
Then I used the e-craft to draw and cut the tag sentiment. The E-craft does this differently to the Silhouette, as the Pen and Blade are in the trolley part of the machine together, so you dont have to swap one out to use the other.
I embossed the base card with the folder, then assembled it.


Right for those of you who have paid attention: I am giving away 3 CD's and a reference sheet. I received them in the Goody Bag at the Doncaster Workshop, as I already have them.
Now I am NOT giving you my copy! As I wouldn't part with it! But I am giving away the spare set.


The Quintessential Country Garden Double CD set is heaving with Fabulous Floral Images, I have used it for some Custom cards, which I dont photo, once you have one of my cards made for you, that's it, I never replicate them, wether I am proud of them or not, they never get made again.
But back to the disk's, one of my Favourite collections by MCS, some vintage themes, pretty themes, men's theme's, you name it it's all here, fab butterflies, and birds, and obviously Flowers. As the new program Elite was released in April, and this tied in with the move to QVC UK, for new users they sent it out with the quick reference sheet, and a video on how to use it, so you have the complete package, and are able to play with the program in the same way I do.

So to enter just leave a comment at the end of this post saying you would like the disks, this will run for 2 weeks, then I will get Youngest to draw a name out the hat, and sent out. (mainly coz I have no idea how that Random Org thingy works, oops!)

hugs to all

Lou

Wednesday, August 08, 2012

oopsie, had to check, oh dear!

Well the title says it all really! I had to check wether or not I had actually posted this card! How bad is that? In fairness I made it 2 days ago, the night before my mate turned up to play, and it was put to one side for later, lol, so I am only a day behind!

This is quite a delicate card for me, so much so that I wonder wether it is too delicately coloured, wether I should have gone for darker inks or not?
But it's made, and you should all know by now, that I am an honest blogger, and boy have I posted some humdingers in the past!
So what have we got here? An amalgamation of electronic die cutting, manual embossing, stamping using inks, and using pens.
First to be produced was the bird with the flourish tail. Its actually a design I bought from the Silhouette store, and have converted it to be cut with the e-craft, on smooth white 250 gsm card stock. Beak to tail tip it measures 5 1/2", quite sizeable really. So fine I had this lovely bird.....what to do now?
So out came Mr Happy and a Sizzix embossing folder I received in my Goody bag from the My Craft Studio workshop in Doncaster. Okay, so now it is beautifully embossed, but it needs something to make it pop!
Milled Lavender Distress ink, and a large head blusher brush, as Doncaster had completely sold out of large Brushes for ink dusting with (boy was I not pleased about that), to add definition to the embossing.
Okay so now I am working in the lilac/purple range, which decided the base card colour, and the Matt cut from a sheet of 12 x 12" Docrafts Capsule collection paper.
A lilac ribbon, and it really needed something else.....hmmn! Okay, so out came some cute little stamps I got as a freebie with Nicky Hall's Creative Chronicles magazine, again from Doncaster. Some tiny little Lavender bunches! Perfect, but they are small, and I wanted to use 2 colours on the stamps........Whispers pens to the rescue! So a purple and a green pen at the ready I proceeded to stamp a little line of Lavender bunches above where I would place the ribbon. Huffing periodically to re-awaken the ink, yes those huff pens, they're the ones!
So ribbon attached, birdie attached, gems sorted just needed a sentiment, so Heartfelt wishes from the same stamp set, and what did I do? Picked up the WRONG INK PAD!!!! AAAAARRRGHHHH!!!!
Bit late now though! I picked up the Tattered Rose instead of the Milled Lavender! Now sorry I'm no Barbara Grey, even though the stamps are clear, as my hands dont hold steady enough, so it has to stay this way, until I root out everything again, and die cut a piece to stamp on, then I can cover it up, and hopefully hide the miss match in colours!
Told you I'm honest lol

hugs to all who make mistakes, Boy do I know how you feel!
So lets see if the various members of challenge groups have a good old giggle at my mistake!
The Pink Elephant:: TPE 160, use ribbon
Papertake Weekly Challenge: Anything goes
lou xxx

Tuesday, August 07, 2012

I got Raided!

Help!! Some one stop her!!! Some woman's just raided my craft room, scoffed all my food and done a runner!!
Lol, not really, but I did get raided, luckily she bought her own bag, and didnt take bits I wouldnt let her have, lol, but she had fun playing, and I fed her well, lol.
So I expect to see loads of bits I recognise on Linda Simpsons blog in the next day or two, lol!
In the meantime, here's a card for one of the DT's I havent taken part in for a while: I have actually been quite poorly, and physically making a card was beyond me, but I now know what else is wrong, so am able to put it behind me and move on, so I am starting slowly with one team, then increase to two, then back to full strength again I hope!
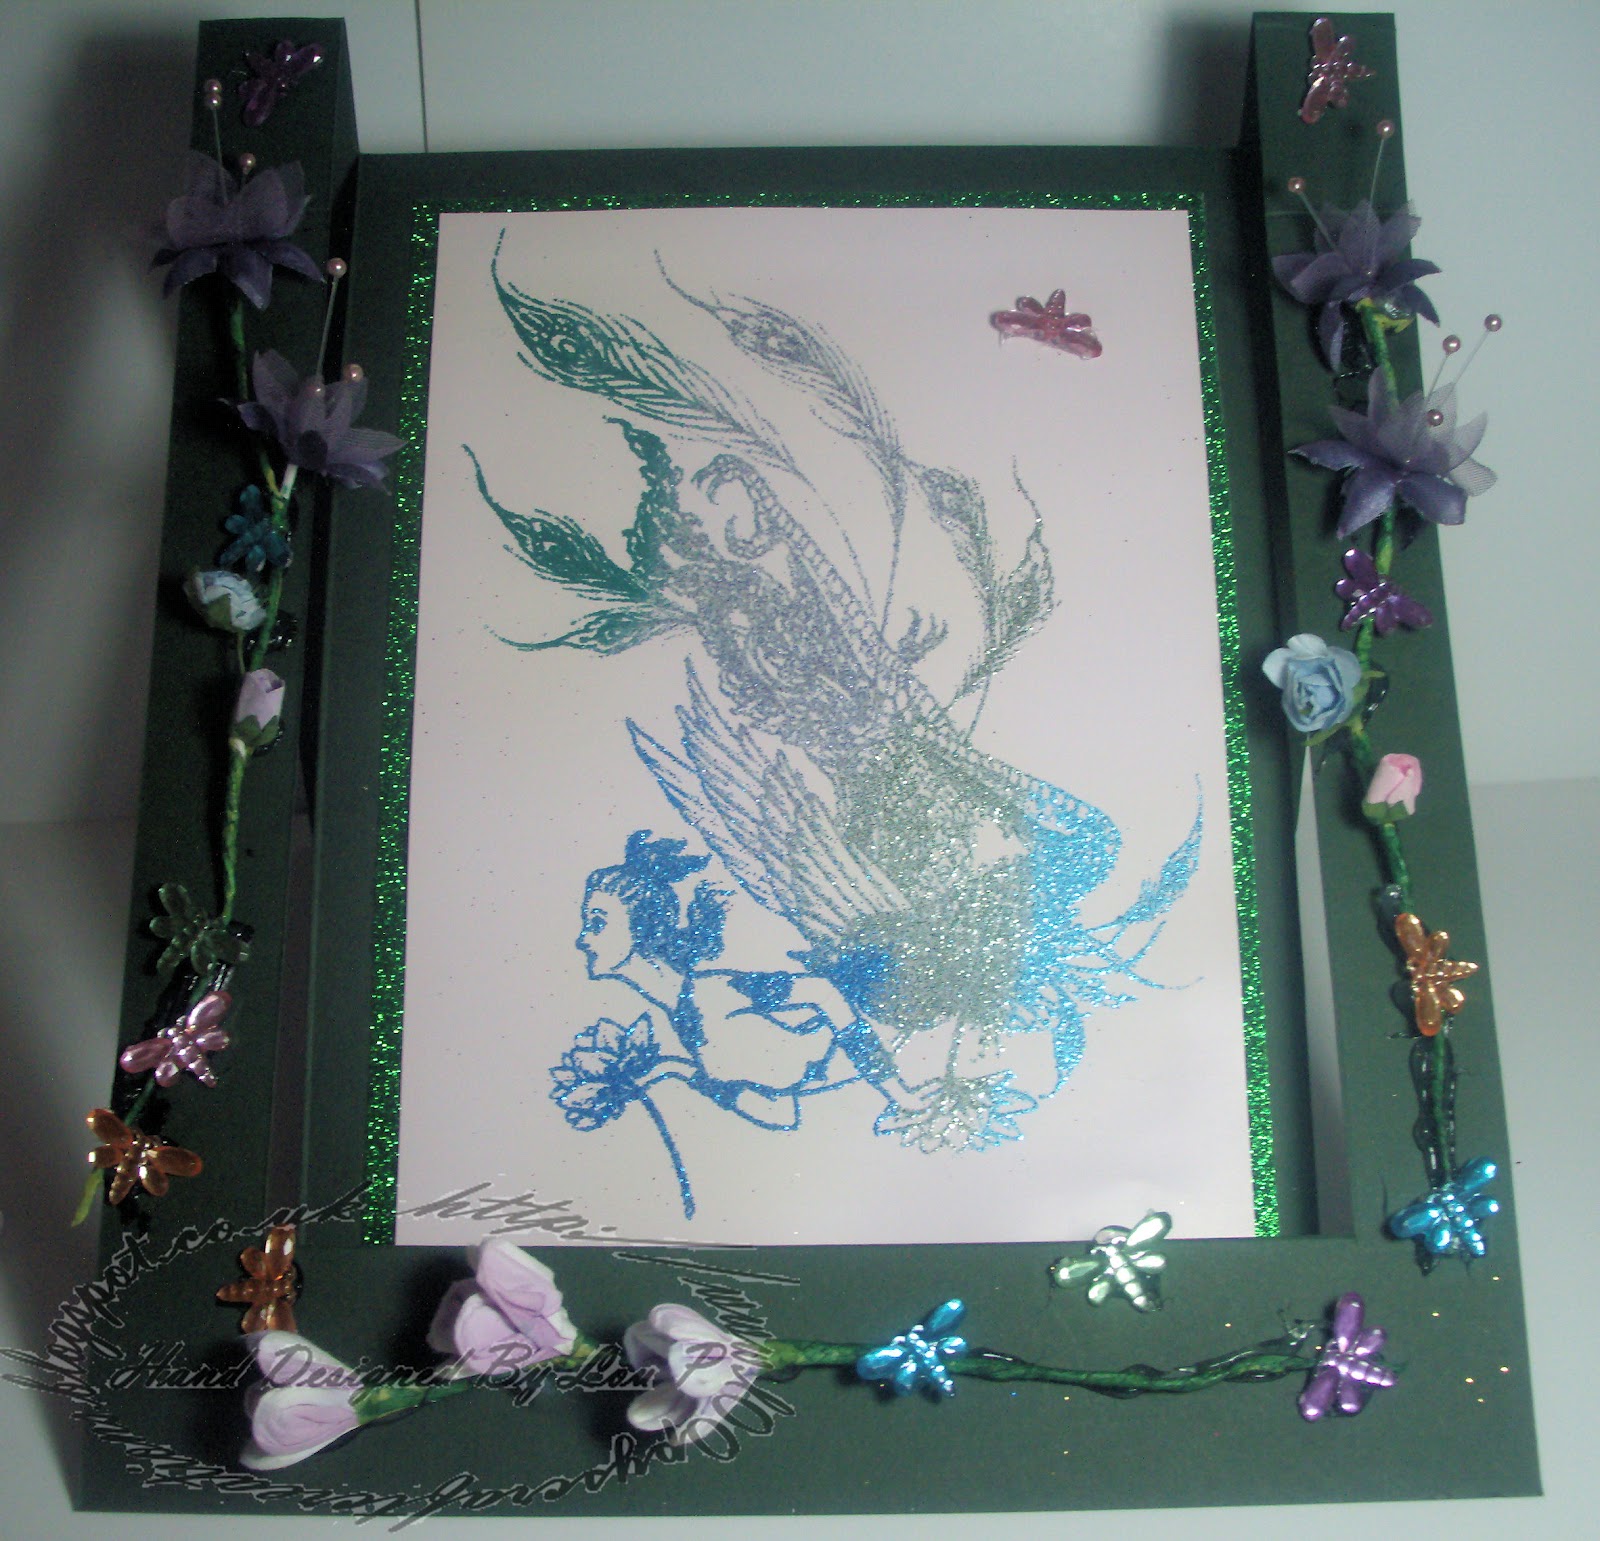
So here is rather an eye catching image from the Scrapbook Stamp Society. Its one of those you keep looking at, and every time you look at it, you see a bit more. It's one I have had in my stash for some months, and it was only today, that I looked at it and thought A-ha!

The digi is called Kinnaree, a rather unusual fantasy piece, of a woman with a birds wings and legs, not quite a Griffin, but close.
To look at the image there is a lot of detail, and it would be a big piece indeed were I to colour it, so I took the cowards way out......... I printed it on Melt dust paper, which as far as I know is a product specific to My Craft Studio. The ink lies on top of the paper, and doesn't soak in when you print it, but isn't all over tacky like a photography paper.
The advantage of this is that you can then glitter and/or emboss the image with powder, and then heat gently, until the powder melts.
This image has 5 colours of melt dust powder on it, dark green, light green, and 3 shades of blue, as I was aiming at a Peacocks colouring, and was mounted on some dark green glitter cardstock.
I created a laid back central stepper card, to display the image clearly, and decorated it with some flowers from my stash, and lots of coloured gem Dragonflies.
I hope you like my first real attempt for some months at a designed card,

hugs

Lou

Sunday, July 01, 2012

More MCS sneak peeks.....

....hope I dont post ones I have already done, lol.
So bearing in mind that these are kits, here is the Antique Window aperture card kit, by MCS, which you will be able to get from QVC on Tuesday, as part of the TSV shows.
The one I have shown before was the Nature range, where I removed the foiled frame from the topper and placed it on the outside of the card. This time, I made a feature of the window aperture by using one of the Diecut Birdcages, from a Previous Kit by MCS, Quintessential Country Carden. The Paperstash Kits are very good quality Card bases, and take rough handling with ease, so the Bird Cage was distressed with Chipped Sapphire, and a Touch of Black Soot, to darken it. Then took spme Navy organza Ribbon and made a double bow, then heated it with the heat gun to crinkle it. Acetate was placed behind the window with thin DST.
Inside the card I used some coredinations cardstock, and embossed it using a Touch of Mica Mask. Then sanded it back, and distressed it with the same mix of distress ink I had used on the frame. The coredinations was trimmed to fit, then mounted on some Gold Mirri, as that is the colour of the foiling on the topper, which was mounted on the card base with some foam pads. then I re-enforced the pre scored fold lines on the card base,  as it is scored with a spine, to allow dimension within the aperture.
So another card I like, lol, I was going to give this to my Dad, lol, as he's quite a fan of books like the Difference Engine by William Gibson and Bruce Sterling, one of the few Steam Punk books I know of, but then he is a Fan of both Technology, and Steam, Having hand-built a 22' Steam Launch in his Garage, lol
Right another of my eviction Cards.......... This is what was left over from My last set of Sneak Peeks for MCS, firstly they are hard to photograph, being Mirri based, and printed on top, and secondly, Acetate can be a pain, especially in this weather, lol, Natural daylight being at a premium!
So this is using 2 of the bits I got sent, the Beautiful acetate, and one remaining topper. the topper was fixed to the acetate with DST, and then the Acetate was fixed to a Black Card base with some Rivets, okay, yes I am in a Riveting phase at the moment, but the are good for Fixing things without glue or DST showing. These Rivets are actually Friskars decorative Rivets, an assortment of snowflakes, Christmas trees, and Stars.

So thats it for now, as I am facing another short eviction, while some MORE shelves are added, lol

hope you'll pop back later, and see more, xx

Hugs

Lou

Saturday, June 30, 2012

MCS Sneak Peeks, and a Christmas card

Well, yet another card from MCS's new release on Tuesday, on QVC, and yet another of the cards I made whilst Banned from the pc and Craft room!
The kit gives you matching shaped cards and toppers, but I do like to change things around a bit, so this card isn't meant to go together if you know what I mean?
Luckily the colours work across the range and mixing an Matching isnt too much of an issue as they are tonal. so its not an issue. So the Label topper with a different shaped Label card base. I took the base, and added some gold edged ribbon, coloured with a Caramel promarker. Placed the topper at a jaunty angle over the Top and added some gems, simple quick effective. Just needs a suitable insert and its ready to go. The shapes used on these toppers and card bases are actually on the My Craft Studio Nesting Shapes CD, and if you have a Cameo, or other programmable electronic cutting machine, then you can also use the trace feature, and cut your own card bases with out needing a die-cutting machine such as the GC, Cuttlebug, or Happy Cut.

This is one of my Grab what you can cards! And is made with last years Hunky Dory set, that was in a tub I grabbed while being bodily forced out of here. A strip of Pre-embossed Snowflake cream card, and a 3 part topper, mounted onto a Purple card base. The Topper is actually DL sized, but with the matting and Layering, its a bit wider that ordinary DL, but not wide enough to be a Tall DL. So A custom Envelope will have to be made. Its simply highlighted with some Red, and Gold Cosmic Shimmer PVC Mica glue, on the flower centers and berries. I do like purple at Christmas, as this is the Traditional colour, that we used to have, Purple being the colour of Royalty. Father Christmas, St Nick, Santa all used to be dressed in Purple, until the Coca-Cola adverts!
Shows what an impact advertising has on our lives doesn't it?
anyway, enough of a rant from me, hope you like them, and dont forget to watch the TSV on Tuesday on QVC, and see what other goodies Steph has to offer us!

hugs, and I'll be back later with yet more, lol

Lou

Friday, June 29, 2012

MCS post 3....................

Hmmn, Decisions decisions.................What to show you this morning?
This is a wonderful Kit! Again the Nature part of the kit is Owl based, and beautiful! And this card is all diecut for you so all you have to do is pop the bits out and put them on! From the card base itself, to the little hangers for the 3 pictures.
In my family there are 2 Teachers, my Stepmother, and my Great Aunt, so Owls are a good Stash Theme for me, as they traditionally represent wisdom and Teachers, and these Owls are cute!
It is really easy to put some lovely cards together with this kit. This one was made with the addition of one co-ordinating ribbon strip from another sheet, and all the bits from the kit sheet, but don't go throwing the empty sheets away! There's a couple of cards I made with the "Scraps" to show after!


Now to one of the cards made while banned.....
This had previously been die cut from an insert from a used Christmas card, and stuck in my bits drawer, which was one of the few things I grabbed on eviction. The die used was Spellbinders Labels 20, and I edged the diecut with a gold pen and added a bit of glitter which you cant see on this picture.
The backing paper is a floral Pabric sheet, a cross between Fabric and paper, as it has the texture of a woven fabric, but is made of paper obviously. I matted a piece of it to some gold mirri card, as it suited the theme I was aiming for, an older type of card, but with a modern twist., and mounted it on the left hand side of my Lilac Card base. the die cut insert was placed on top of a small strip of |Lilac dotted ribbon from my tub of small ribbon bits. During my eviction I did receive the fabulous Christmas flowers bundle from a previous MCS QVC show, so trimmed the bottom 2 "branches" from one of the sprigs, and managed after a bit of a struggle, to tie the remaining piece of dotted ribbon, around it and the base strip to secure it in place. I edged the card base with a gold marker pen, and then added 3 gold gems to the bottom Right just to finish it off, There's enough room left for a sentiment, if I want to put it on, but I don't know, it might upset the balance of the card.
What do you think?

Hugs

Lou, xxx

Thursday, June 28, 2012

Antique................

Well that's the theme for another part of the Paper Stash Kit on Tuesdays QVC shows!
When Diane asked me to choose a part kit, I was torn between the Antique and the Owls, which are the Nature set, so she was kind enough to let me play with both.
This one is from a Shaped card kit, but not actually the right shaped topper, now I have told you you can see it cant you, lol.
So I knew what I wanted to use on these cards, but obviously I cant go too OTT with them, as they are supposed to be examples, and inspire you.
This one was the one I had to do! Out came the tin foil from a tub of coffee, My Happy Cut, and the Cuttlebug cutting and embossing Folder, with wings, pointy fingers and Keys! So once they had come out of the folder, I attacked them with my Ranger Alcohol inks, Gold, Blue, and Red. Mixed them together on the blending pad, and dabbed away until I was satisfied.
Pinflair holds it all in place, lol, good old Pinflair, its one of the few "glues" that can hold metal, and It was just a case of positioning and arranging the bits for the card to be done.
The kit is very old, almost steampunk in theme, based on old clocks, so there are some more bits to show later, well quite a few in all honesty, I got a bit carried away!
Next up is another of the cards I did while banned from the craft room:

A different colour scheme for Christmas, but I think it works!
Actually Beggars cant be choosers, I couldn't get much card stock, and grabbed all the wrong colours, lol.
So last years Pilkington Lane Christmas stamp, Stayzon Ink pad, and some acetate. I had a piece of my treasured Gold Pearlised card stock, and I am in dire need of more, but cant remember who the supplier is, and I wrapped the aceate around the back of the card, allowing it to bow out at the front. To trim simply some Black Gems that came from Poundland of all places! The card is only small, 3"x 4.5", but I do like it, something a little bit different!
Hope you will pop back later, for more sneaky Peaks of the MCS Paper Stash kit, which will be on QVC in the TSV shows on Tuesday,

xx

Lou

what I have been up to.......

Well here's the first in a series of posts to show what I have been upto, while being kicked out the craft room, and struggling with the FM...............
I set off a few weeks ago to go to Dad's to collect the new unit, and on the way down, I did stop off at My Craft Studio. Well I had to really, either I took the scenic route through Woodhead Pass, and co-incidentally MCS Towers, or I took the much quicker but boring route, Via the motor way. Now as a crafter which would you take? Exactly!
So I went in with youngest in tow, he loves to craft, and nosey in craft shops, so much so that he's quite a well known little person in crafty circles. And he adores Diane Peternell, at MCS. Well she spotted him, and knew that I was in without even seeing me, lol, and she popped out of the office to ask me to do a favour for her. Well who wouldnt, if they were asked so here is one of the cards I made with the Brand new Paper Stash Kit they have asked me to show you..............
Isnt he cute? He is from the Nature part of the Paper Stash Kit, which will be available on Monday 3rd July throughout the day on QVC. MCS is the Todays Special Value (TSV) and Steph will be demonstrating the kit, and card craft for us all. This kit comes with pre-scored card bases, as well as foiled and non foiled diecut toppers.
So I took the stepper card base, and folded it along the score lines. Added the foiled pre printed ribbon, to the front step, and mounted the big owl picture behind on the main card area. Next I took 2 of the small unfoiled toppers, and cut and scored a piece of strong acetate, to form springs for them to bounce on.
I punched some flower shapes from some of the extra card from around the toppers with a tonic flower punch, and made the small flower to match the green in the ribbon, and mounted it next to the sentiment. Finally I coloured 3 medium sized gems with a promarker, and added them to the ribbon. A cute card that you just want to boing! As hubby and kids have been having a bit of a play every time they see it, sigh!

Right as I am so behind on posts I am also going to post about cards I made with no pc, when I got kicked out of here, so hubby could sort it, with every card I post for MCS, so you have plenty to look at and think about, lol.
This was a foiled pre scored and cut card base from one of the Kanban Kits last year, and is a lovely shape to work with as you can do it all sorts of ways.
I took a piece of 6x6 core-dinations card stock, and embossed it with the Snowflake Mask from Touch of Mica in my Happy Cut.
I sanded it back to expose the core, and trimmed it to fit the central panel. Then cut around the inside edges of the two foiled baubles to allow me to slide the corners in underneath before fixing it in place with DST.
Left over from last year are some pre-printed foiled vellums, by Papermania, from the Henbury Lane Quote book. I mounted it on top of the sanded core card, with some lovely Rivets from Friskars, there ones are stars, to match the stars on the card base. The pieces I had trimmed form the core card were then mounted as panels for the 2 sides to complete the card.
Now do Bear in mind, that I had very little to work with, on my own cards as everything was packed away by hubby, as I was frantically deciding what to grab! So Christmas is the theme from me for the next posts of my own cards, and not a promarker in Sight!!
I do hope you will join me in Watching Steph on QVC on Monday. I know she is working really hard to get Crafting on QVC as proper shows with proper demonstrations. And in all honesty, I CANT wait for the 13th of July, a whole days workshop with Stephanie and Nancy, and loads of goodies and giggles, and then a day or two,lol, of shopping at Doncaster, maybe I can squeeze in some make and takes, as well as a good gossip!

have fun, and check back later for more of the cards I made from this yummy kit!

hugs

Lou

Wednesday, May 30, 2012

a late sample

Well I was up late last night, and meant to blog this one this morning before the shows on QVC, but I was too tired and went back to bed!! Sorry!
This is the last one I have done, using those fabulous Toppers by My Craft Studio that sold out so quickly. I don't have to worry though as I ordered mine, lol, and a couple of other bits to play with!
This is using one of the large rectangle foiled/mirri'd toppers.
This kit has thoroughly stumped me! I love them, and I think all the other colours are as stunning as the Red, which I got, if not better!
This is an 8x8" card blank made from 300gsm A3 dark green card. The matt is using the Cheery Lynn Royal coved Rectangles Mega doily die, which I cut on my Happy Cut and no shims. As far as I know the Happy Cut is the Only machine able to do this without breaking. This is on a 350gsm Hammered White Card stock.
I cut a circle from the base card which comes with the kit, as I know now, and split it in half, separating the halves so that I could wrap the Sublime Metallic Twine round the gap, using the die cut as a means of keeping it straight. Next up the topper was placed over the top, using DST.
Now I needed to pull the green from the card base back into the design, so I used the last 3 of those scrummy Silver Rose hips (yes I ordered those as well lol) in my kit, and added a green leaf, as the silver reflects the silver in the die cut. Last but not least, 3 large clear gems in the remaining corners, and Job's a gud 'un!
If you didnt get chance to order them, or thought they were'nt for you, if you know someone who has got them, go and have a peep, they are so much better than any photo or camera work can show.
I have gone off kits recently, preferring to create my own designs, but I can honestly say that these toppers are so very unique, that I had to get them. The quality is superb, better than anything I have ever seen, and up until January I was a Hunky Dory Fanatic, and Kanban kit  fanatic, so that is saying something! The designs are lovely. I didnt buy much from QVC due to the postage rates, but I bought what I would have kicked my self for missing out on, these toppers, the flowers and the moulds.
Hopefully I have given you inspiration over the past few days in how to use these bits I was given, and if you did get them, I would love to be able to pop along and gain inspiration from you in return.

Hugs to all

Lou

Tuesday, May 29, 2012

not too much more I promise!!

Nearing the end, finally! Bit of over kill, possibly? But I wanted to make as much with the kit as I could, show it to its best advantage, and encourage you to combine, and think outside the box a bit!
So you cant really blame me can you now?
Okay, first thing I want to draw your attention to is actually the slight reflection you can see under the card, on the fabric of the Pashmina I photograph on. See the red, and slightly lighter area? Right above this writing?
The reason it is Photographed at this angle is so you have a chance to see the design on the Topper, instead of the reflection of the Camera Flash! And happily it has reflected down onto a completely non reflective Fabric surface. Doesnt that hint at the Brand new Foiling Technique? I dont know of any other foiled image that is completely foiled like these. It isnt Iridescent. its just foiled. It isnt Dufex!
DD came round yesterday, and she had to take a second, third, fourth, fifth, and sixth look! She is still confuseled by how they managed to do it, and to be honest so am I!!
This is pre diecut, and needs nothing done to it, to make it special. But to make a card to do it Justice? Very hard work in deed!
Clean, simple, elegant, is how I decided to do this one.
A 6x6 inch square card base, a small piece of a red Backing sheet that came in the kit, the die-cut, and 8 red gems. Anything else will detract from the impact of the Topper.
So tune in tomorrow to see Steph on QVC with shows at 1,2, and 3pm! yes 3 hrs of Craft on QVC tomorrow!! yippee!!
Now if you want more, try checking back in a bit, I think there's another card left in me, maybe 2 lol, but in the meantime, check out my Teamie on this experiment, the lovely Sharon, who got the blue kit, and that is so scrummy, you can find her here.

Hugs to all, xxx

Lou

Yet more for MCS!!

Okay, Okay, not too much more I promise!!
Tomorrow see's the release of the New Products from My Craft Studio on QVC UK, and the end of the Swearing posts from me for a while!
So First today is a lovely card that came to me while playing around!
When I made the Tassel for the second card, I spread it out in various ways to see how it looked with various bits, as you do. This was a follow on from the white and red Poinsettia card, just using the poinsettia, and the twine to start with.
I cut the twine in strips of 2 1/2 inches, and frayed it all, applied loads of DST to a 3" circle, and spread it by twisting from the centre. Loads of Silicon Glue was used to secure the Poinsettia on top of it.
I must admit, what you are looking at is the second version of this card, I had a lovely Idea to make a circular frame, with an Acetate front to view the Poinsettia through, but I had to de-construct it, as it didnt work the way I wanted it to, Told you, I am an Honest Crafter!
So I had this circle with the Poinsettia, which I really liked, so what to do with it instead?
I will admit, that normally at night I craft in company, as my FG is on Skype and we craft away in different parts of the country, and I was messing around with this circle, Hmmn card, white, so out came an A5 folded card base, hmmn, okay some acetate? okay I liked it! so did FG, so I knew I was on the right track!
Okay Ribbon, over the top? yep that worked but it needed something to balance it..............
Hmmn...............
Not a die cut, but a sentiment, not too big, and maybe make a flat bow? FG was a bit confused at this point.
Hmmnn.........
Aha! Tonic Studio did some decorative staples! I have the kit, now do I have a Christmassy Sentiment,? Nope, Nope, that's Halloween, Nope, No, aha!
Oh B****r! its RED! Need a white, need a white, Blast No White!!!!
Okay, like it but it has to be WHITE!! what have I got that can turn it white?
Hmmn...........
Okay actually Saturday, whilst waiting for the removal van to return, we were helping DD move house back home, I made an excuse to visit a little Craft/Nursery shop in Featherstone, and I had already been frustrated by the fact that my White pigment ink pad had died on Friday night when the Kit arrived, so was after a new one, and picked up a nice white dye based pad, aha!!
Out it came, once hubby was safe in bed, as he didnt know I had been crafty shopping, oops! And I dabbed, and embossed and Dabbed and embossed, you can tell I was determined to turn this red staple white cant you? lol.
So eventually I had a white Happy Xmas Staple, yippee!
FG was still abit confused, by the Flat bow business, I guess I hadnt explained it very well, so out came the pins, to pin everything in place while I tried to persuade the staple machine to avoid the pins, and staple in the right place without moving the ribbon....easier said than done!
But eventually I did it! A flat bow, with a flat centre! Now just to stick it all together! Finished! "Tah dah!" I said.
Only to discover I had made an Australia card!!!! Oh NO!!!!!!! For those of you in Australia it would be an England Card, upside down!!
Out came the guillotine! And actually it does look very good with the small red edge to the white, ties it all nicely together, phew!!
Well that was a card and a half wasn't it, now how many of you are going to be honest and admit you've done it all too?

Hugs to all, especially my new followers, thanks for joining in, xxx

Hugs

Lou

Monday, May 28, 2012

Another new product release

Well you must be getting sick and tired of all these , and I apologise for swearing, Christmas cards. But there's more to show, and you haven't seen half of it yet!!
This card is showing the Brand new Foiling technique My Craft Studio have devised. A completely foiled topper, yet you can still see the picture. It is NOT Dufex! It doesn't have the iridescence of dufex, and isn't intended to!
So to the card: A base card base, scored to form a drop in frame, which I removed. Metallic Twine, secured in the fold of the card to dangle the foiled topper from Jump rings.
The outside of the card was stamped with a V&A Christmas Border stamp in Versamark and silver dollar embossing powder, then coloured with Tim Holtz Fired Brick distress ink.
The inside has the same stamp in the fired brick, but isn't embossed.
Due to removing such a large piece of card, the frame can become unstable, and want to pray on you, so to stop it, I added a couple of folded pieces of card inside to stop it sliding down with the weight of the topper, which also allows the Topper to swing freely, and catch the light in any small breeze.
I LOVE these toppers, they are so Luxurious, and they really catch the light, I for one will have the old card ready for Wednesday I can tell you, I Nnnnneeeeeeeeeeeeeeeeeeeed these toppers!!
And they will be available 1-4pm on QVC on Wednesday!
more later, lol

Hugs

Lou

My Craft Studio New products

Well here's card 3 that I created with the new products being Launched on QVC on Wednesday, by My Craft Studio!

This one is using more of the Brand new Acetate which will be available on QVC on Wednesday between 1-4pm.

Word of Warning.......This Acetate is gorgeous! You wont want to use it!! Its a really stiff acetate quite capable of standing on its own as a card base, But I didn't want to use so much of it on one card, hence, me being very Parsimonious with it, and only using small bits!! You wont want to be extravagant with it either!!

A piece of A5 white card, scored and folded in half lengthwise. The Acetate is an overlay, fixed to the card by a small strip on the back of the card. Told you I was parsimonious with it!
And a die cut using the Royal Coved Rectangle Mega doily die by Cheery Lynn. The sentiment has been stamped with Tim Holtz Fired brick distress ink, and the stamped sentiment, was a freebie with a craft magazine, I think.
Because of the details in the die, I was able to use the yummy Metallic Twine looped into the edge to provide definition and interest, and tied in a small bow.
The Twine is beautiful, and if you like the frayed look its very easy to achieve, as it is loosely wound.
Check back at 2pm for the next one lol

Hugs,
Lou

QVC New products........

Well here's card 2

This one is a 5x5 Square card base, embossed with Craft Concepts Funky Poinsettia embossing folder.
I cut 2 matts using Spellbinders Labels 4, one in red Mirri, and one in plain white card stock, and embossed the white piece while it was still in its frame.
That was the base sorted.
I made a tassel using the brand new Metallic Twine, which will be available on QVC on Wednesday between 1-4 pm, with My Craft Studio, as it does fray perfectly, and mounted it behind the Sumptuous Poinsettia, and Silver Rose hips, which are also New releases.
Simple, stunning, effective.
I am so in love with these flowers and twine, they are scrummy!!!

Pop back at 12 for the next release!!

hugs

Lou

QVC new releases....

Well I said to check back today to see what I have been playing with, so here's the full card, I am going to do each one separately, so you can see them in all their glory!
Here's card 1
This is fab!
I love this card!
The stamp is one of Pilkington Lanes Christmas scenes form last year, stamped in Tim Holtz Black Soot distress ink. But what makes this card stand out from the crowd is the Acetate!
The Acetate is one of the new products being released on Wednesday on QVC between 1-4pm by My Craft Studio! Its a very heavy acetate, scores well and holds it's shape excellently. It's beautifully pre-embossed with flourishes, this one's in Silver/white, depends on the light really.
A small gutted piece of this has been placed onto the Black card, and the stamped image matted on top of it. It makes the stamped image stand out, and Black and White Christmas cards can be very hard to do, and really gives it the touch of Luxury.
I mounted it onto a plain white card base, and used a Letraset Fine liner to create a small frame around the edge of the card and the stamped image. The black gems are positioned over the glue points holding the acetate in place.

Hope you like it, I must admit, its one of those products that I want to make the most of, and not waste a single snippet of, as it really is Luxurious!

Hugs, and don't forget to check back in a couple of hours to see the next one!

Lou

more sneak peeks

well I said I would be back, lol, just like the terminator, so here's a couple more shots of some sneak peeks of products due to launch on Wednesday on QVC.

Check in this morning, to see the full cards, as I'd love to see what you think of them...............

Hugs

Lou

Sunday, May 27, 2012

Sneak Peeks.........

I was honoured to be asked to Blog, some new Products that will be on QVC this Wednesday1-3 pm, so here's a couple of sneak peeks to give you an idea of what I am working on.....

These are New Products which will be available from QVC by My Craft Studio as of Wednesday, and I must admit, they are extremely lush, so much so that I am being very parsimonious as to how I use them, yes I am Gutting!!
There will be 3 more sneak peeks today, from me, and the products and images will go live on my Blog tomorrow morning , and day, I dont know what the deals will be for these kits, but believe me I have the old credit card to hand, ready and waiting!!!
Hopefully what I am producing will both inspire, and encourage you to tune into QVC on Wednesday for craft shows at 1pm, 2pm, and 3pm.! Three full hours of continuous Craft on QVC!!!!! With Stephanie Weightman, and cakes, yum yum!
hugs

Lou

Monday, February 06, 2012

Confused.com

Okay, I have no idea how this..............


Turned into this....................
Well I tell a lie, sort of, you see the tag I had intended to go with the woven matt, but as I wasnt happy with the matt, I had to create a new card which went with the tag, if you get what I mean?
Have you ever done that? Started with something, then gone somewhere completely different?
It seems to me to happen with somewhat disconcerting regularity. Yet at other times I have an idea in mind, and whoosh its a card!


Like this one....................
I knew exactly what I wanted, and ended up with exactly what I wanted!
I am going to disappoint my FG now, as I was intending to submit this to a magazine, but it's too late now, so here it is!

I am leaving the Green card sentiment free, until such time as It's needed, and the brown one is for anyone who is fed up with their anniversary being ignored or forgotten, second thoughts I might save it for my anniversary........................

The tag is from Red Hot Bed , dont know which one, the card was embossed with a Pronty A4 Butterfly Stencil, from The Art of Craft, the flowers, Ribbon and mirri from my stash.

The grumpy old lady is from Creative expressions Ethel and friends, and the background and Heart from My Craft Studio Enchanted Romance. Hope you enjoyed them, xx

Lou